Editor’s Note: This post is another entry in the Prepper Writing Contest from R. Ann Parris. If you have information for Preppers that you would like to share and possibly win a $300 Amazon Gift Card to purchase your own prepping supplies, enter today.
Work Smarter Not Harder – In The Garden
Sometimes in the preparedness folds, we really get wrapped around axles. We have so much that we’re learning and trying to do, and we’re regularly doing it on a budget – which is just one more thing that circles around our heads and beats us up.
We can limit some of the pains of preparedness by changing how we look at things, but also how we do things. Gardening and larger-scale growing is routinely on our to-do list. It’s something that’s going to come as a shock for those who don’t practice ahead of time, no matter how many tricks get applied. However, we can save some time and stress on our bodies with a few low-cost and low-skill tricks and tools, and see increased yields. Bigger yields means lower dinner costs and potentially some increased food storage, letting us expand our preparedness in other ways.
Here are a handful of quickie, usually highly inexpensive – easy garden hacks to save time, money and labor. As you read them, don’t forget: Paper products are compostable.
Mulch
Mulch makes life easier.

Mulch can be straw or wood chips, lightly soiled animal litter, mown or whole leaves, the tips of branches we’re pruning, or shredded white paper. Shredded paper will settle into a mat that makes it tough for weeds, but “loose” mulch routinely does better with a weed suppression barrier down first. We can use newsprint, cardboard, or phone book pages as a weed suppressor and to keep small plants free of dirt kicked up by rain. We won’t get the same moisture-holding and soil aeration improvements, we will still have to weed some, especially if we already have beds that are weed prone, but it lessens our time spent sitting or crouched and bent over.
Mulch lessens the pains of gardening. We don’t weed as much, our plants do better, and we don’t have to water as much.
In some forms of mulch gardening, the mulch stays right there year-round. Some styles use a mulch that in hot, damp climates rots enough during the off-season and is tilled in that winter or early in spring. In others, we scoot aside just enough to drop seeds or transplants in during succession plantings, add amendments like cured manure or compost or pH-raising pine by raking it just into or over the surface, and add mulch more slowly.
For some information about various mulch-style gardens, you can check out the free video for Eden-style gardening here http://www.backtoedenfilm.com/ or at www.filmsforaction.org. For sure read up on Ruth Stout, the first lady of working smarter not harder.
Plastic bottles


We don’t store water or foods in milk jugs because they’re porous and can leach previous content out slowly, but they have their place among soda and juice bottles in the garden.
Various bottles can be used to make mini-greenhouses, cloches, scoops, and seed spreaders, as well as mouse and rat traps (2Ls can work for small squirrels and chipmunks, too, or slow them down enough for the garden terriers to get there). They’re great for vertical strawberry and herb and lettuce towers. We can use them to keep cord from tangling, and punch various holes to use for spreading amendments and treatments. Whack them in half, use sourdough starter and water or beer, and they catch horrific numbers of slugs.
For time savers and back savers, though, bottles really excel at helping us water.
Sub-irrigated planters for buckets and storage tubs and conventional planters can be made using bottles for the tubes instead of aquarium or garden hoses or PVC.
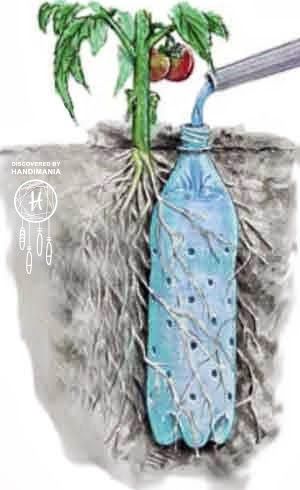
Whether we grow in raised beds or tilled rows, mulched beds or multi-layered hugel or lasagna beds, we can use bottles as a spin on olla irrigation, too. We can drill holes all over, as shown in the graphic from http://plantcaretoday.com/soda-bottle-drip-feeder-for-vegetables.html, bury it near our plants, and use a hose to fill it quickly. A similar version plants the bottle cap-down, with holes drilled in the cap and the sloping neck, and the inverted bottom cut entirely or with just enough remaining to make a flap. Those are even easier and faster to fill, with less aim needed.
The water from those will then sink out slowly, watering deep at the roots and watering our plants, not the weeds or walkways. Less water is lost to evaporation, and we don’t have to deal with timers or hose connections, or PVC to avoid standing out there forever to slowly sink in water. We pour it in, fill it up, and move to the next. If it’s really hot and dry, we might need to repeat, but it’s a low-tech, low-expense way to work faster than standing there with a hose or moving hoses back and forth so we can mow.
Maybe that means less time on our feet overall, or maybe that lets us progress to our weeding and suckering or the next round of planting.
Seeding time – The Dibble
A dibble is basically just something that makes a hole for us. Usually, it’s a somewhat shallow hole and it’s usually intended for seeds but we can work with that. There are two general types, rolling or boards, although with leek dibbles (which work with any transplant), you walk around with a rake or double-handle tool poking your holes. Boards are typically set up with dowels that will poke holes, or come as cutouts and we use something to poke holes to our desired depths. Rolling dibbles tend to be drum or wheel style.


Plans are out there for dibblers that can run from almost nothing if you salvage parts or make minis out of coffee cans and 12” PVC or make a single, double- or triple row dibble wheel out of bikes from Craigslist. Drum styles can cost as much as $100-200 to make at home if you’re inclined to go that route instead. Some of the really fancy board dibblers even get marked in colors so one board can be used for spacings from 1” to 6”.
In no-till schemes where you drag a pointed hoe to clear a spot for seeds, dibble wheels tend to be handy. In tall raised beds and window boxes or trays, a board dibbler may be more beneficial.
Using dibbles at whatever scale we choose to lets us quickly mark the space for seeds and transplants. Even if we have to go back with a post hole digger for some of those transplants, time spent upright instead of crouched tends to make for happier backs.
Seeding time – Furrowing rake
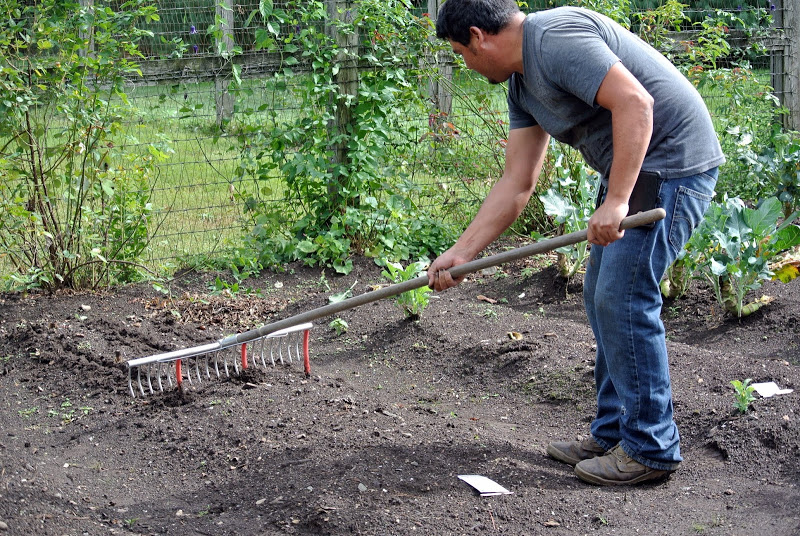
A furrowing rake is the simple DIY result of adding tight, relatively stiff hose or PVC to an ordinary hay or garden rake, and using it to drag lines along a prepared bed. It’s typically done so that the extensions are movable, letting us go as tight as the 1-1.5” gaps of the rake tines out to the full 1-2’ width of that rake.
We can get as complex as we like, adding marker lines to tell us how deep we’re aiming, or using multiple depths so we can plant cutting salad greens in the shallowest grooves and have deeper grooves for our peas. We can drag it both down and across a bed to create a grid, with seeds going at the cross points.


Taking a few minutes to prep some moveable rods or pipes and lay out our grid – while standing – limits how much measuring we do while we’re bent or crouched, saving time and pain with a very quick and low-cost trick.
Seeding tubes or pipes
Dibbles and furrowing aren’t the only way to limit how much time we spend crouched over during seeding time. Even a congestion-planting scheme that calls for under-seeding doesn’t have to be done from a stool or our knees.
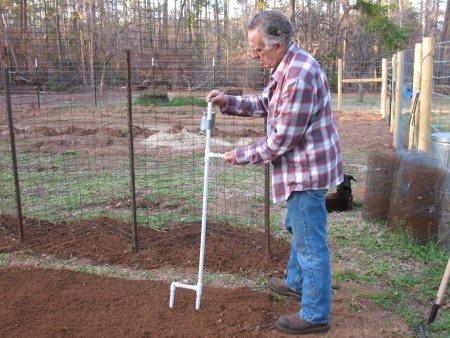
There are a couple of tiers of standing seeders for small plot growers, from this really simple version http://knowledgeweighsnothing.com/how-to-build-a-back-saving-pvc-corn-bean-seed-planter/ to this more advanced DIY https://thinmac.wordpress.com/a-homemade-seed-planter/.
Those aren’t really necessary, though. All you really need is a pipe smooth enough for seeds to roll through cleanly and sturdy enough to stand up straight.
If you want to work with tiny seeds as well as larger ones, maybe you lay on skinnier aquarium tubing to attach to a tool handle or yardstick (with rubber bands, even), and make yourself a pasteboard, tin-can or paper funnel and tape it in place. Use the back-end of a teaspoon or the little measuring spoon from somebody’s aquarium chemicals to fish out 2-5 seeds at a time.

Seed tapes and mats
If we’re not digging the various seeding tubes, we can also use our rainy days or blistering hot days to make seed tapes out of strips of paper, or larger seed mats out of unfolded paper napkins and paper towels like these http://annieskitchengarden.blogspot.com/2009/09/september-22-2009-home-made-seed-mat.html & http://simple-green-frugal-co-op.blogspot.com/2009/12/construct-your-own-seed-mats.html . We don’t have to mix up some kind of funky glue like with some of the DIY-ers show. The toothpick dab of white Elmer’s the first site shows is water-soluble and works just fine.
When we’re ready to plant, we just zoom along exposing our soil or following her mix, lay out our mats, and cover them again. We can work in fair-sized lengths that we roll up around an empty tube and then just nudge along using a broom or hoe, or use a square or two at a time that lets us stagger our planting for a staggered harvest or interspersed companion flowers.
Seed mats and strips can also be made out of a single thickness of newspaper pages for larger seeds like peas and beans as well, although we’ll want to make a small 1/8” slit or poke a pencil-tip hole through to give our seeds a head start on busting through the heavier paper.
Since we’re planting 3-6” or as much as 8-12” apart in those cases, whether we do rows or congestion beds, working with a larger paper size makes sense. The newspaper sheet will decay over the season, but being thicker, it does offer a nice head start for our seeds over the weed seeds that may be lurking below. Being thicker, it also does better if the seed gets that head start of a slit.
No more removing gloves. No more exposing seed packets to dirt and moisture, or unfolding and refolding and sticking them in a pocket as we try to keep track of where exactly the tiny black seeds landed in our bed. And since they’re evenly spaced instead of scattered in lines and areas, it’s minutely easier to tell which tiny baby dicot we should be plucking when the weeds start – at least we can work quickly in some of the gaps.
In the garden – Avoid the crouch-ouch
So why the focus on things that improve soils without hauling lots of bales, limiting all the bending, limiting the bending and time we spend watering (or pumping water), collecting trash to make all kinds of weird contraptions in the garden? It’s not just me being a greenie, I promise.
Especially for seniors and those with nagging pains and injuries, the ability to work standing upright or from a chair without leaning over or reaching far can not only increase the joy of gardening, but in some cases go as far as making gardening possible again.
Arthritic hands, shaking from an injury or age, and loss of full motor function from an accident can make it frustrating and painful even to fetch out and drop a lima or pea, let alone broccoli and spinach, and unless they’re willing to just punch some holes in a baggy and shake, just forget about iceberg and romaine and strawberry spinach.
The ability to work slowly over winter or summer to prepare for spring and autumn leaf and root crops, the ability to use a tube and funnel, then shake or scoop seeds using something they can actually grip is enormous.
Reexamine how you garden
Even for those in good health or who just like to be out there, some simple and inexpensive DIY projects and some trash collection and reuse can save a lot of time.
That might make a difference in garden size now, while we’re working and balancing families. It will definitely make a difference later, when we’re depending on those gardens to feed us or add a little forkability and crunch to our starvation-staving diet (I loved that article, BTW).
Saving backs and creating easy-to-use tools can also let us involve our parents and kids a little more in some cases, giving them independence and sharing the satisfaction that comes from a meal we procured for ourselves. There’s little better in life than seeing that pride returned to your parents and grandparents, or watching it bloom in your children.
It also sucks to fail, especially when we have a lot of time invested in something.
Water reservoirs, reduced weed competition, proper seeding coverage, and workload-friendly seeding methods can help increase our rate of success, which encourages us to do it again.


