By: Mary Lou Shaw
I saw dried tomatoes selling for $10/pound at a food coop and thought that price was outrageous. Now that I make and eat my own dried tomatoes, I think they’re priceless.
My husband and I can pretty much eat year-round from our small Ohio homestead. Preserving the summer harvest is an important part of doing this, but when I can find a new way of processing food that results in more variety for winter meals, I’m
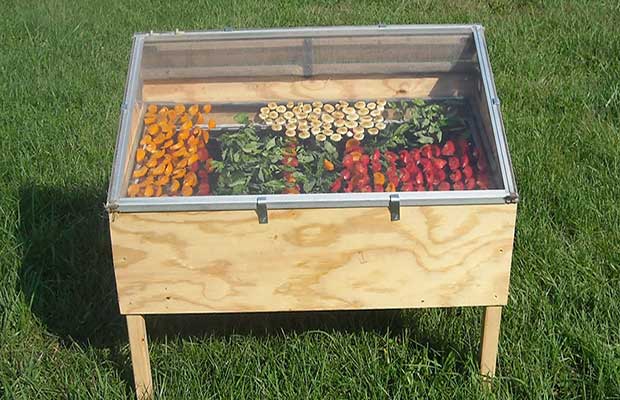
We learned to both make and use the food dryer by following Eben Fodor’s excellent directions in his book, The Solar Food Dryer. The body is made from recycled cortec and the hardware bought locally. We ordered the polypropylene screen that the food sits on from the reference given in the book. We didn’t want to risk galvanized metal or aluminum screens interacting with the food.
One thinks of summertime as having long days and the sun high in the sky—perfect for a solar dryer. In reality, the days are getting shorter and the arc of the sun lower by August and September when most fruits ripen. Fortunately, the plans include a built-in light bulb that provides backup electric heat if the day becomes overcast or if the food needs drying into the evening.
The one design detail I would change for our latitude is to tilt the dryer a bit more to face the lower arc of the late summer sun. The original angle was calculated by taking our latitude and subtracting 15 degrees. So far, we’ve only use ours in late summer, and have increased the angle by elevating the back legs on two-by-fours. We may soon commit to that angle by shortening the front legs.
A thermometer tells us the internal temperature of the dryer as we rotate it during the day to face the sun. Our goal is to keep the temperature in the 120 to 150 degree range. If it gets too warm, an additional screened vent can be opened as much as necessary.
I make it sound as if we’re standing by the dryer monitoring and adjusting its progress throughout the day. In reality, the homestead’s too busy for that, but the dryer does well with two or three adjustments during the day as we’re walking through the backyard doing other projects. It wouldn’t work, however, to put it out in the morning and leave for work until late in the day. It needs help in following the sun.
Preparation of the food for drying is pretty fast and easy. I prepare the tomatoes by giving them a minute or two in boiling water so they’ll peel easily, and then slicing them as uniformly as possible. I’ve even dried paste tomatoes by just halving them. It’s amazing how small and intensely flavored they become when most of their water is gone.
Preparing the apples for drying is easy and fun if you have a manual apple peeler-slicer-corer. This even gives you slices of equal thickness. The apple slices require no treatment to keep them from discoloring—the drying results in a slightly darker color anyway.
I judge when it’s time to take the food out of the dryer by making sure it’s beyond the sticky stage, still a bit leathery (a good excuse to taste-test!) but not brittle. Then I put it immediately in a container where it won’t rehydrate in the humid summer air. Glass jars with tight lids are a nice option, but need to be kept in a cool place. I sometimes freeze the fruit in
There are books that give recipes for making “fruit leathers” when drying, but I really dislike adding sugar to food that tastes so great with just its own fructose. I dry the apples and tomatoes plain, and I often savor them as “plain” winter treats. However, these dried tomatoes are great in pasta or soups, and the apples add incredible flavor to even vegetable dishes.
Anyone gifted by me with dried fruit must know that they are a very good friend indeed!


